

Basic Best Practices After creating AWS Account

Search for a command to run...
No comments yet. Be the first to comment.
ဒီ post လေးထဲမှာတော့ Regional NAT Gateway နဲ့ Zonal NAT Gateway ကွာခြားချက်တွေကို နှိုင်းယှဉ်ပြသွားမှာဘဲ ဖြစ်ပါတယ်။ ပထဆုံးအနေနဲ့ NAT Gateway ဆိုတာ ဘာလဲ ဘာအတွက် လိုအပ်တာလဲဆိုတာကို အရင်ပြောပြပေးပါမယ်။ P

High Level ရေးထားတာပါ ဒါပေမဲ့ လွယ်ပါတယ် ကိုယ့်မှာ AWS Infra တွေရှိတယ်ဆို တွေ့သမျှ metric တွေကို alarms တွေလုပ်ပြီး notification ယူမနေဘဲ တကယ် effective ဖြစ်တဲ့ metric တွေကိုမှ CloudWatch ရဲ့ alarm feature တွေနဲ့ ပေါင်းပြီး ပို့စေချင်ပါတယ်။ ဥပမာ prod...
ကိုယ့်ရဲ့ data center (on-prem) network နဲ့ AWS ချိတ်ဆက်ဖို့ လိုလာပြီဆိုရင် ဘယ်လို ချိတ်ဆက်ကြမလဲ? အပိုင်း (၂) မှာ တော့ Direct connect အကြောင်းကို ဆွေးနွေး သွားမှာ ဖြစ်ပါတယ်။ အပိုင်း (၁) Site-to-site VPN အကြောင်းကို လေ့လာချင်ရင်တော့ အောက်ပါ link မှာ ...
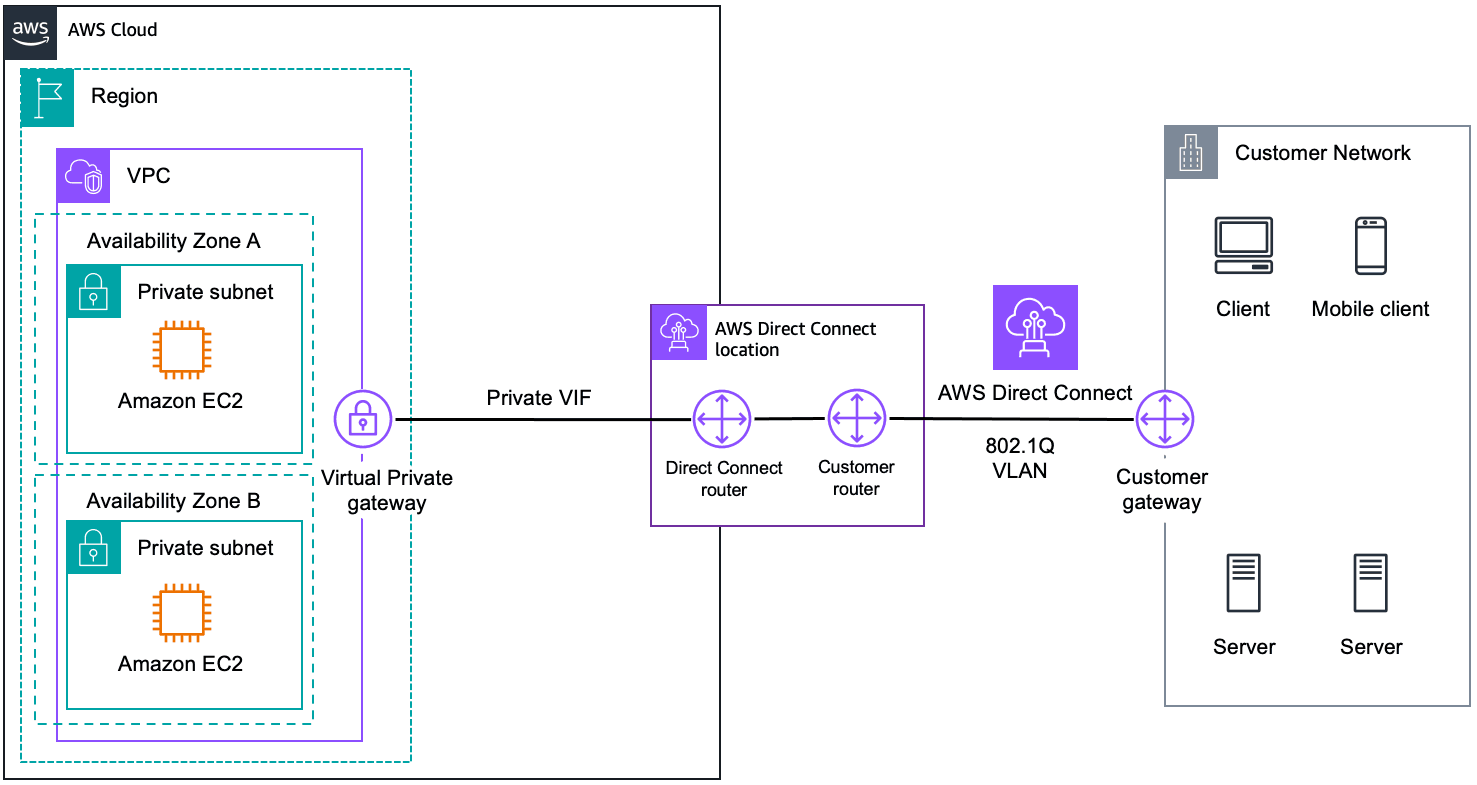
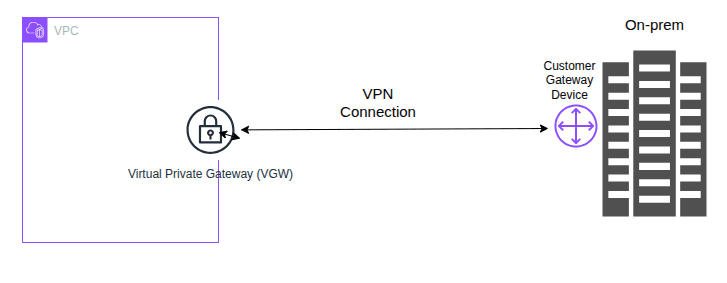
ကိုယ့်ရဲ့ data center (on-prem) network နဲ့ AWS ချိတ်ဆက်ဖို့ လိုလာပြီဆိုရင် ချိတ်ဆက်နိုင်တဲ့ နည်း (၂) နည်း ရှိပါတယ်။ 1. Site-to-Site VPN (Virtual Private Network) 2. Direct connect Site-to-Site VPN - On-prem network နဲ့ AWS resources တွေ ချိတ်ဆက်တဲ့...
လွန်ခဲ့တဲ့အပတ်က ရုံးက Designer တွေနဲ့ တော်ကီပွားရင်း Accessibility နဲ့ပတ်သတ်တာတွေ သူတို့ကို ရှင်းပြဖြစ်တယ်။ ကိုယ်တိုင်ကလည်း အရင်ကတည်းက ဒီ topic ကိုစိတ်ဝင်စားလို့ လေ့လာနေတာဆိုတော့ အခွင့်အရေးရရင် ရသလို sharing လုပ်ဖြစ်တယ်။ အဓိကက Accessibility နဲ့ပတ်သတ်...

AWS root user create လုပ်ပြီသွားတဲ့ အခါမှာ Security Best Practices အရ Root user ကိုMFA ( Multi-Factor Authentication) enable လုပ်ထားသင့်ပါတယ်။
IAM user create လုပ်ထားသင့်ပါတယ်။ IAM user create လုပ်ပြီး အဲ့IAM user အတွက်permission သတ်မှတ်ပေးရပါမည်။ IAM user ကို လည်းMFA enable လုပ်ထားသင့်ပါသည်။
Cost Control Best Practices အရ billing alerts နဲ့ free tier usage alerts တို့ကို enable လုပ်ထားသင့်ပါတယ်။
Log in with root user. Type your email address and password.

You will see the following page. Go to IAM dashboard to enable MFA.


Click Add MFA.

You will see the following page.
“Device name” သတ်မှတ် ရပါမည်။Device options (3) မျိုး ထဲမှAuthenticator app ကို သုံးပြီး လုပ်ပြပေးသွားပါ့မယ်။
Next>

No.1 အနေနဲ့ မိမိph ထဲမှာ Authenticator app install လုပ်ထားရပါမည်။
(Google Authenticator app or Microsoft Authenticator or others…….)
No.2 Show QR ကို နှိပ်ပါ။ ပေါ်လာသောQR ကို Authenticator app မှScan လုပ်ပါ။
No.3 Authenticator app မှ ပေါ်လာသော Code No ကို ရိုက်ထည့်ပါ။ Code No 2 ခု ရိုက်ထည့်ပေးရပါမည်။
Add MFA ကို နှိပ်ပါ။

You will see the following page after Add MFA.
IAM > Dashboard
ပုံမှာ ပြထားတာ လေးကတော့ Root user ရော IAM user ရော MFA Enable လုပ်ထားတာလေး ဖြစ်ပါတယ်။

Go to IAM dashboard and click Users. And then click “Create user”.

Type username and set password.
(Check “Provide user access to the AWS Management Console- optional)

Set “AdministratorAccess” permissions.


Create user.


IAM user create လုပ်ပြီးသွားပြီ ဆိုတော့IAM user နဲ့ login ဝင်ကြည့်ပါမယ်။
IAM user sign in အတွက်Account ID or alias လိုအပ်ပါတယ်။ Account alias မသတ်မှတ်ရသေးတဲ့ အတွက် Account ID နဲ့ ဝင်ပါမယ်။ မိမိ သတ်မှတ်ခဲ့သောIAM username and password လိုပါမယ်။

You will see AWS management console home page after login.

IAM user နဲ့ login ဝင်တဲ့ အချိန် တိုင်းAccount ID မှတ်ထားစရာ မလိုဘဲ မိမိ သတ်မှတ်ထားတဲ့Alias နဲ့ ဝင်ဖို့ အတွက် အခုAlias သတ်မှတ်ပါမယ်။
Alias သတ်မှတ်ရန်အတွက်IAM page ထဲသို့ ဝင်ပါ။

IAM > Dashboard > Account Alias Create ကို နှိပ်ပါ။

Set your alias.

Now you can login with your alias.
မိမိ create လုပ်ခဲ့သော alias, IAM username, password တို့နှင့် login ၀င်ပါ။

Login ၀င်ပြီးတဲ့အခါ Console home page ရဲ့ ညာဘက်အပေါ်မှာ alias name, account id and IAM user name တို့ကို တွေ့ရပါလိမ့်မည်။

Go to the “Billing and Cost Management” Page.

And then go to “Billing preferences”. (Billing Preferences အကြောင်း နောက်တွင် အသေးစိတ်ထပ်ရှင်းပါမည်။) You will see the following page.

IAM user သည် Adminstrator access permission သတ်မှတ်ထားပေမယ် Billing Preferences page ထဲသို့ဝင်ကြည့် ရန်permissions လိုပါသည်။
Billing Preferences page ထဲ သို့ ဝင်ဖို့ လိုအပ်သည့် permissions ကို Root user ဘက်မှ Activated လုပ်ပေးရပါမည်။ ထို့ကြောင့် root user နှင့် login ပြန်ဝင်ပါမည်။
root user နှင့်login ဝင်ပြီး လျှင် ညာဘက် အပေါ် မှာ ရှိသော Account ID dropdown arrow ကို နှိပ်ပြီးAccount ကို နှိပ်ပါ။


Scroll down, you will see the “IAM user and role access to Billing information” is “Deactivated”.
So, you need to activated. Go to Edit.


Check “Activated IAM access” and click update.


After Activated, login with IAM user and check Billing Preferences. You can access Billing Preferences page like that.

Billing Preferences မှာ ဘာ တွေ လုပ်လို့ ရလဲဆိုရင်
AWS မှာ ကိုယ်သုံးထားတဲ့service တွေက ဘယ်လောက်ကျလဲ ၊ ဘာservice တွေသုံးထားလဲဆိုတဲ့ Monthly invoice တွေကို PDF format နဲ့ကိုယ့် ဆီemail ပို့အောင် Invoice Delivery Preferences ကိုActivated လုပ်ပေးလို့ရပါတယ်။
Free Tier Alerts နဲ့ ပတ်သတ်တဲ့ usage တွေကို ကိုယ့်ဆီEmail ပို့အောင် သတ်မှတ်ထားပေးလို့ရပါတယ်။
CloudWatch billing alerts တွေ လက်ခံလို့ ရအောင် enable လုပ်ပေးလို့ရပါတယ်။

Click “Edit”.

Check “PDF invoices delivered by email” and then click Update.


Setting up CloudWatch billing alarms
CloudWatch billing alarms ဘာလို့ သတ်မှတ်သလဲဆိုရင် ကိုယ့်ရဲ့ AWS total bill သည် ကိုယ်သတ်မှတ်ထားသော ပမာ ဏ(e.g - 5$) ထက်ကျော် ခဲ့ မယ်ဆိုရင် ကိုယ့်ဆီ Noti ပို့အောင် လို့ သတ်မှတ်ခြင်းဖြစ်ပါတယ်။
CloudWatch မှာ Billing Alarms သတ်မှတ်မယ်ဆိုရင် Region သည် N.Virginia (us-east-1) ဖြစ်မှ Billing Alarms သတ်မှတ်လို့ရပါမည်။
Go to CloudWatch > Alarms > Create alarm


Conditions မှာ
Threshold type > Static
Greater than 5 USD သတ်မှတ်ပါမည်။ (မိမိလိုအပ်သော amount သတ်မှတ်နိုင်ပါသည်။)
Next.

Select “ Create new Topic” Topic name ပေးပါ။ Email ထည့်ပါ။ Click Create Topic.


ကိုယ့်ရဲ့ Email ထဲ ကို Confirm လုပ်ဖို့ mail ရောက်လာပါလိမ့်မယ်။ Confirm Subscription ကိုနှိပ်ပါ။


Alarm name သတ်မှတ်ရပါမည်။


