Provisioning EFS with EC2 instances in Terraform

Amazon Elastic File System (Amazon EFS) ဟာ AWS က စီမံပေးသော severless storage ဝန်ဆောင်မှု တစ်မျိုး ဖြစ်ပြီး petabytes (PB) အထိ အလိုအလျောက် ကြီးထွားနိုင်ပါတယ်။ သူက Network File System (NFS) protocol ကို အသုံးပြုထားပါတယ်။ သူ့ကို Amazon Elastic Compute Cloud (EC2) ချိတ်ဆက်ပြီး အသုံးပြုနိုင်ယုံတင်မက AWS lambda၊ on-prem server များမှပါ အသုံးပြုနိုင်ပါတယ်။ ဒီ blog မှာတော့ EFS ကို မတူညီတဲ့ Availability Zones (AZs) တွေမှာ ရှိတဲ့ EC2 တွေကနေ ဘယ်လို ချိတ်ဆက်လို့ရလဲဆိုတာကို terraform သုံးပြီး setup လုပ်ပြပေးသွားမှာ ဖြစ်ပါတယ်။
Terraform နဲ့ ပတ်သက်ပြီး အခြေခံ ကို သိချင်ရင်တော့ ကျွန်တော့ အစ်ကို တစ်ယောက်ရေးထားတဲ့ introduction-to-terraform-with-aws Blog ကို ဖတ်ကြည့်ကြည့်လိုက်ပါ။ ရေးထားတာ တော်တော် စုံလင်ပါတယ်။
General Architecture

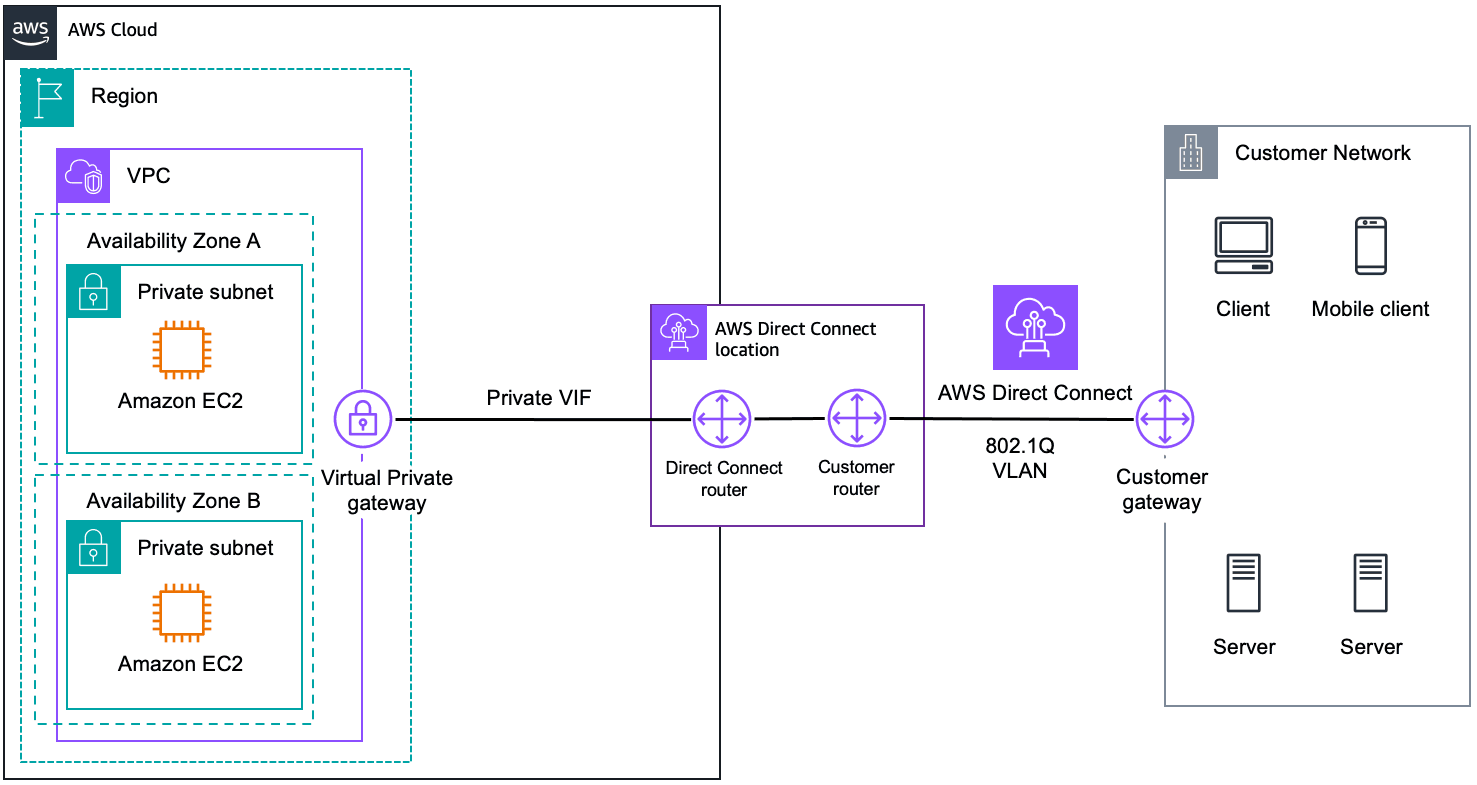
ကျွန်တော်တို့ setup လုပ်မယ့် ပုံစံလေးကတော့ Virtual Private Cloud (VPC) တစ်ခုရှိမယ်။ အဲ့ VPC ထဲမှာ public subnets လေးတွေရှိမယ်။ public subnets ထဲမှာ EC2 instances တွေရှိမယ်။ အဲ့ EC2 instances တွေက EFS လေးကို mount လုပ်ပြီးသုံးနေတယ့် ပုံစံလေး တခုအနေနဲ့ လုပ်ကြည့်ရအောင်။
Requirements
စာဖတ်သူ မိတ်ဆွေတို့အနေနဲ့ စမ်းသပ်ဖို့ အတွက် terraform install လုပ်ထားဖို့ နဲ့ aws account တစ်ခုရှိဖို့ လိုအပ်ပါတယ်။ ကျွန်တော်ကတော့ စမ်းသပ်ဖို့ အတွက် အသုံးပြုနေတာ ဖြစ်လို့ IAM user ကို Administratorfullaccess လုပ်ဆောင်နိုင်စွမ်း ပေးထားခြင်းဖြစ်ပါတယ်။ Production အတွက် လုံးဝ (လုံးဝ) မပေးသင့်ပါ။ လိုက်လံ စမ်းသပ်ပြီးချိန်တွင်လည်း IAM user ကို ပြန်ဖျက်ဖို့၊ သုံးထားတဲ့ access key တွေကို ဖျက်ပေးဖို့ မမေ့ပါနဲ့။
Access Key Permissions

terraform.auto.tfvars
aws_access_key = "generated_access_key"
aws_secret_key = "generated_secert_key"
Access key တွေကို .bashrc ကနေ environment variable အနေနဲ့ ဖြစ်ဖြစ်၊ terraform.auto.tfvars ကနေ terraform variable အနေနဲ့ ဖြစ်ဖြစ် ကြေညာပေးပါ။
Setup
Directory Structure

Directory structure အနေနဲ့တော့ ကြည့်လိုက်ရင် ရှုပ်တယ့်လို့ ထင်ရပေမယ့် files တွေကို ကြည့်သွားရင် နားလည် သဘောပေါက်သွားမှာပါ။ ပထမဆုံး variable.tf ကနေ စကြည့်ကြရအောင်။
variable.tf
variable "aws_access_key" {
  type        = string
  description = "Access key of AWS to access from terraform"
  sensitive   = true
}
variable "aws_secret_key" {
  type        = string
  description = "Secret key of AWS to access from terraform"
  sensitive   = true
}

variable "subnets" {
  description = "subnets ips and zones"
  type = map(object({
    cidrs = object({
      ap-southeast-1a = string
      ap-southeast-1b = string
      ap-southeast-1c = string
    })
  }))
  default = {
    public = {
      cidrs = {
        ap-southeast-1a = "10.0.1.0/24"
        ap-southeast-1b = "10.0.2.0/24"
        ap-southeast-1c = "10.0.3.0/24"
      }
    }
    private = {
      cidrs = {
        ap-southeast-1a = "10.0.128.0/20"
        ap-southeast-1b = "10.0.144.0/20"
        ap-southeast-1c = "10.0.160.0/20"
      }
    }
  }
}

variable "application_instance_size" {
  type        = string
  description = "instance size of application instances"
  default     = "t2.micro"
}

variable "application_instance_azs" {
  type        = list(string)
  description = "azs of application instances"
  default     = ["ap-southeast-1a", "ap-southeast-1b"]
}

variable "efs_mount_point" {
  type = string
  description = "Mount path of EFS in EC2 instance"
  default = "/mnt/efs/fs1"
}
ပထမဆုံး အနေနဲ့တွေ့ရမှာကတော့ aws_access_key နဲ့ aws_secret_key ဆိုတဲ့ variable တွေပါ။ သူတို့က အရှေ့မှာ ပြောခဲ့တဲ့ IAM user ကနေ ထုတ်ထားတဲ့ access key တွေ လက်ခံယူပြီး AWS ကို authenticate လုပ်ဖို့သုံးမှာ ဖြစ်ပါတယ်။ default value မပါတဲ့အတွက် value ပေးမှ terraform က run မှာပါ။
subnets variable ကတော့ VPC ဆောက်ဖို့အတွက် အသုံးပြုသွားမှာ ဖြစ်ပါတယ်။ အခုစမ်းမယ့် project အတွက် public subnets နှစ်ခုပဲ လိုအပ်ပေမယ့် စာရေးသူအနေနဲ့ စစမ်းတုန်းက private 3 ခု၊ public 3 ခု ရည်ရွယ်ပြီး ဖန်တီးခဲ့တာဖြစ်လို့ အနည်းငယ် ရှုပ်ထွေးနေသလို ဖြစ်နေပါတယ်။
application_instance_size ကတော့ ကျွန်တော်တို့သုံးမယ့် EC2 instance လေးရဲ့ type ကို ကြေညာထားတာပါ။ free tier နဲ့လည်း စမ်းလို့အဆင်ပြေအောင် t2.micro ကို ရွေးချယ်ထားပါတယ်။
application_instance_azs မှာတော့ EC2 ကို တည်ဆောက်မယ့် AZs တွေ ရှိနေပါတယ်။
EFS ကို EC2 instances တွေရဲ့ ဘယ် path မှာ mount မလဲဆိုတာကို efs_mount_point variable မှာ ကြေညာပေးထားပါတယ်။
backend.tf
terraform {
  required_providers {
    aws = {
      source  = "hashicorp/aws"
      version = "~> 4.0"
    }
  }
  required_version = ">= 1.2.0"
}
ဒီ file မှာတော့ သုံးထားတဲ့ terraform provider ရဲ့ version ကို သတ်မှတ်ထားပါတယ်။ ပရောဂျက် အစတုန်းက backend နဲ့ ဆိုင်တဲ့ block တွေပါ ရေးခဲ့လို့ backend.tf လို့ ဖြစ်နေတာပါ။
main.tf
provider "aws" {
  region     = "ap-southeast-1"
  access_key = var.aws_access_key
  secret_key = var.aws_secret_key
  default_tags {
    tags = {
      region  = "Singapore"
      project = "testing"
    }
  }
}
AWS access အတွက် အဓိက ရေးထားတာပါ။ region အနေနဲ့ singapore region ကို အသုံးပြုထားပါတယ်။ default-tags ကို အသုံးပြုပြီး create လုပ်မယ့် resources တိုင်းကို အလိုအလျောက် tags ထားတာပါ။ နောက် file ကစပြီး resources တွေ စဆောက်ကြရအောင်။
vpc.tf
resource "aws_vpc" "testing" {
  cidr_block           = "10.0.0.0/16"
  instance_tenancy     = "default"
  enable_dns_support   = true
  enable_dns_hostnames = true
}

resource "aws_subnet" "public_subnets" {
  for_each          = var.subnets.public.cidrs
  vpc_id            = aws_vpc.testing.id
  cidr_block        = each.value
  availability_zone = each.key
  tags = {
    Name = replace(each.key, "ap-southeast", "public")
  }
}

resource "aws_subnet" "private_subnets" {
  for_each          = var.subnets.private.cidrs
  vpc_id            = aws_vpc.testing.id
  cidr_block        = each.value
  availability_zone = each.key
  tags = {
    Name = replace(each.key, "ap-southeast", "private")
  }
}

resource "aws_internet_gateway" "internet_gateway" {
  vpc_id = aws_vpc.testing.id

  tags = {
    Name = "igw-testing"
  }
}

resource "aws_route_table" "public_sub_internet_rt" {
  vpc_id = aws_vpc.testing.id

  route {
    cidr_block = "0.0.0.0/0"
    gateway_id = aws_internet_gateway.internet_gateway.id
  }

  tags = {
    Name = "rt-testing"
  }
}

resource "aws_route_table_association" "public_sub_internet_rt_asso" {
  for_each       = var.subnets.public.cidrs
  subnet_id      = aws_subnet.public_subnets[each.key].id
  route_table_id = aws_route_table.public_sub_internet_rt.id
}
Terraform module ကိုသုံးပြီး vpc တစ်ခု အလွယ်တကူ တည်ဆောက်နိုင်ပေမယ့် ဒီနေရာမှာ for_each ကို ရင်းနှီးသွားအောင် အသုံးပြုပြထားတာပါ။ တူညီတဲ့ resource ကို တည်ဆောက်တဲ့ အခါ ခဏခဏ ပြန်မရေးဘဲ object type variable တစ်ခုကို loop လုပ်ပြီး တည်ဆောက်နိုင်ပါတယ်။ public subnets တွေ internet access ရအောင် internet gateway တစ်ခု နဲ့ route table တွေပါ create ပေးရပါတယ်။ private subnets တွေကတော့ ယခု ပရောဂျက်မှာ အသုံးပြုထားခြင်း မရှိပါ။
efs.tf
resource "aws_efs_file_system" "efs_testing" {
  lifecycle_policy {
    transition_to_ia = "AFTER_30_DAYS"
  }
  encrypted        = false
  performance_mode = "generalPurpose"
  throughput_mode  = "elastic"
  tags = {
    "type" = "efs"
  }
}

resource "aws_security_group" "sg_EFS" {
  name        = "efsSecurityGroup"
  description = "Allow NFS access from public subnets to efs "
  vpc_id      = aws_vpc.testing.id
  ingress {
    description      = "NFS acceess allow to efs"
    from_port        = 2049
    to_port          = 2049
    protocol         = "tcp"
    security_groups  = [aws_security_group.sg_application_group.id]
    cidr_blocks      = []
    ipv6_cidr_blocks = []
  }
  egress {
    from_port        = 2049
    to_port          = 2049
    protocol         = "tcp"
    security_groups  = [aws_security_group.sg_application_group.id]
    cidr_blocks      = []
    ipv6_cidr_blocks = []
  }
  tags = {
    Name = "sg_efs"
  }
}

resource "aws_efs_mount_target" "efs_mt_public_testing" {
  file_system_id  = aws_efs_file_system.efs_testing.id
  for_each        = var.subnets.public.cidrs
  subnet_id       = aws_subnet.public_subnets[each.key].id
  security_groups = [aws_security_group.sg_EFS.id]
}
VPC တစ်ခု တည်ဆောက်ပြီးတဲ့နောက်မှာတော့ EFS ကို ဆက်လက် တည်ဆောက်သွားပါမယ်။ AWS console မှာ EFS တစ်ခု ဖန်တီးတဲ့အခါ default ရှိမယ့် argument တွေအတိုင်း ရေးထားတာ ဖြစ်ပါတယ်။ encryption ကိုတော့ စမ်းသပ်ရာမှာ key management မလုပ်ချင်တာကြောင့် ပိတ်ထားပါတယ်။ EFS ရဲ့ security group ကိုတော့ NFS port ကိုပဲ နောက်လာမယ့် application instances တွေ အတွက်ပဲ ဖွင့်ပေးထားပါတယ်။ ကျွန်တော်တို့ သုံးမယ့် public subnets တစ်ခုခြင်းဆီမှာ EFS ရဲ့ mount target ကို create ထားပါတယ်။
keypair.tf
resource "tls_private_key" "key_pair" {
  algorithm = "RSA"
  rsa_bits  = 4096
}

resource "aws_key_pair" "ec2_key_pair" {
  key_name   = "ec2_key_pair"
  public_key = tls_private_key.key_pair.public_key_openssh
}

resource "local_file" "ssh_key" {
  filename        = "${aws_key_pair.ec2_key_pair.key_name}.pem"
  content         = tls_private_key.key_pair.private_key_pem
  file_permission = "0400"
}
EC2 တွေကို connect လုပ်ဖို့ SSH key တွေ create ထားတာပါ။
ec2.tf
data "aws_ami" "amazon-linux-2" {
  most_recent = true
  filter {
    name   = "owner-alias"
    values = ["amazon"]
  }
  filter {
    name   = "name"
    values = ["amzn2-ami-kernel-*-hvm-*-x86_64-gp2"]
  }
}

resource "aws_security_group" "sg_application_group" {
  name        = "applicationSecurityGroup"
  description = "Allow ssh access from internet to applications"
  vpc_id      = aws_vpc.testing.id
  ingress {
    description      = "ssh acceess allow to ec2"
    from_port        = 22
    to_port          = 22
    protocol         = "tcp"
    cidr_blocks      = ["0.0.0.0/0"]
    ipv6_cidr_blocks = []
  }
  egress {
    description      = "Allow all outgoing connections"
    from_port        = 0
    to_port          = 0
    protocol         = "-1"
    cidr_blocks      = ["0.0.0.0/0"]
    ipv6_cidr_blocks = []
  }
  tags = {
    Name = "sg_applications"
  }
}

data "template_file" "efs_userdata" {
  template = file("${path.module}/scripts/efs_userdata.sh.tpl")
  vars = {
    efs_dns_name = aws_efs_file_system.efs_testing.dns_name
    mount_point  = var.efs_mount_point
  }
}

resource "aws_instance" "application" {
  count                       = length(var.application_instance_azs)
  ami                         = data.aws_ami.amazon-linux-2.id
  instance_type               = var.application_instance_size
  key_name                    = aws_key_pair.ec2_key_pair.id
  vpc_security_group_ids      = [aws_security_group.sg_application_group.id]
  subnet_id                   = aws_subnet.public_subnets[var.application_instance_azs[count.index]].id
  associate_public_ip_address = true
  user_data                   = data.template_file.efs_userdata.rendered
  depends_on                  = [aws_efs_mount_target.efs_mt_public_testing]
  tags = {
    Name = "${aws_subnet.public_subnets[var.application_instance_azs[count.index]].tags.Name}-ec2-instance"
  }
}
ပထမဆုံး block မှာတော့ amazon linux 2 ရဲ့ AMI id ကို ရှာပြီး data source အနေနဲ့ ထည့်ထားပါတယ်။ application တွေရဲ့ security group အနေနဲ့ port 22 ကို SSH အတွက် ဖွင့်ပေးထားပါတယ်။ EC2 instance နှစ်ခုကို အရှေ့မှာ provision၊ ကြေညာပြီးသား value တွေသုံးပြီး တည်ဆောက်လိုက်ပါတယ်။ depends_on argument ကတော့ EFS ရဲ့ mount target resource ပြီးမှ EC2 ကို create လုပ်စေချင်လို့ ထည့်ရေးပေးထားပါတယ်။ EC2 စပြီး initialize ဖြစ်တဲ့ အချိန်မှာ run စေချင်တဲ့ script ကိုတော့ template file နဲ့ရေးထားပါတယ်။
Note: SSH access အတွက် 0.0.0.0/0 ကို production အနေနဲ့ အသုံးမပြုသင့်ပါ။
efs_userdata.sh.tpl
#!/bin/bash
yum update -y
yum install -y amazon-efs-utils
mkdir -p ${mount_point}
mount -t nfs -o nfsvers=4.1,rsize=1048576,wsize=1048576,hard,timeo=600,retrans=2,noresvport ${efs_dns_name}:/  /mnt/efs/fs1
echo "${efs_dns_name}:/ ${mount_point} nfs defaults,_netdev 0 0" >> /etc/fstab
ရိုးရိုးရှင်းရှင်း bash script လေးပါပဲ။ EFS mount အတွက် လိုအပ်တဲ့ amazon-efs-utils ကို သွင်းတယ်။ mount point directory ဖန်တီးတယ်။ mount ရမယ့် command ရေးထားတယ်။ ဒီမှာ ပါတဲ့${mount_point}, ${efs_dns_name} တွေကို ec2.tf ရဲ့ template_file block ကနေ variable ပေးထားတာဖြစ်တယ်။ EC2 ရဲ့ user_data မှာတော့ variable တွေ အစားထိုးပြီးသား file ရောက်သွားမှာ ဖြစ်တယ်။
Output.tf မှာတော့ terraform apply ပြီးတဲ့နောက် ကျွန်တော်တို့ကို ပြစေချင်တဲ့ output variable တွေ ထည့်ရေးပေးထားတာပါ။
output.tf
output "efs_filesystem_dns_name" {
  description = "DNS name of the created EFS file system"
  value       = aws_efs_file_system.efs_testing.dns_name
}

output "efs_filesystem_id" {
  description = "DNS name of the created EFS file system"
  value       = aws_efs_file_system.efs_testing.id
}

output "amazon_linux_2_ami_id" {
  description = "Ami id of the amazon linux 2 image"
  value       = data.aws_ami.amazon-linux-2.id
}

output "aws_instance_public_ips" {
  value       = aws_instance.application[*].public_ip
  description = "Public Ips of EC2 instances"
}
လိုအပ်တဲ့ file တွေလည်း စုံပြီဆိုတော့ terraform စ run ကြရအောင်။
$ terraform init
$ terraform plan
$ terraform apply
ကျွန်တော်တို့ ရေးထားတဲ့ အတိုင်း terraform apply ပြီးတဲ့ အခါမှာတော့ outputs လေးတွေ ထွက်လာပါတယ်။ ssh private key ကလည်း file အနေနဲ့ ထွက်လာမှာမို့ တစ်ခါထဲ ssh command သုံးပြီး ဝင်လို့ရသလို AWS console ကနေဘဲ instance connect နဲ့ပဲ ဝင်ချင်ရင်လည်း ရပါတယ်။

ကျွန်တော်တို့ ရေးထားတဲ့ အတိုင်း terraform apply ပြီးတဲ့ အခါမှာတော့ outputs လေးတွေ ထွက်လာပါတယ်။ ssh private key ကလည်း file အနေနဲ့ ထွက်လာမှာမို့ တစ်ခါထဲ ssh command သုံးပြီး ဝင်လို့ရသလို AWS console ကနေဘဲ instance connect နဲ့ပဲ ဝင်ချင်ရင်လည်း ရပါတယ်။

df -h ဆိုတဲ့ command လေးသုံးပြီး ကြည့်လိုက်ရင် EFS က EC2 မှာ ကျွန်တော်တို့ ဖြစ်စေချင်တဲ့ အတိုင်း mount နေတာကို တွေ့ရမှာပါ။ အလားတူပဲ နောက် instance ထဲ ဝင်ကြည့်ရင်လည်း တွေ့ရမှာပါ။
အားလုံးစမ်းသပ်ပြီးရင်တော့ မလိုအပ်ဘဲ ကုန်ကျစရိတ်မရှိအောင် ပြန်ဖျက်သင့်ပါတယ်။ IaC tool တစ်ခုကို သုံးပြီး ရေးထားတဲ့ အတွက် အလွယ်တကူ ဖျက်နိုင်ပါတယ်။
$ terraform destroy
ဒီ setup လေးမှာတော့ ကျွန်တော်တို့ EC2 instance တွေကနေ EFS ကို terraform သုံးပြီး ဘယ်လို ချိတ်ဆက်အသုံးပြုလို့ရလဲ ဆိုတာကို လေ့လာခဲ့ရတာဖြစ်ပါတယ်။ အခု စမ်းသွားတဲ့ ကုဒ် ကို ဒီ GitHub repository မှာလည်း ကြည့်ရှုလေ့လာနိုင်ပါတယ်။ access key တွေကိုတော့ အသုံးမပြုတော့ဘူးဆို ပြန်ဖျက်ပေးရန်လိုအပ်ပါတယ်။ အဆုံးထိ ဖတ်ပေးတဲ့ အတွက် ကျေးဇူးတင်ပါတယ်။