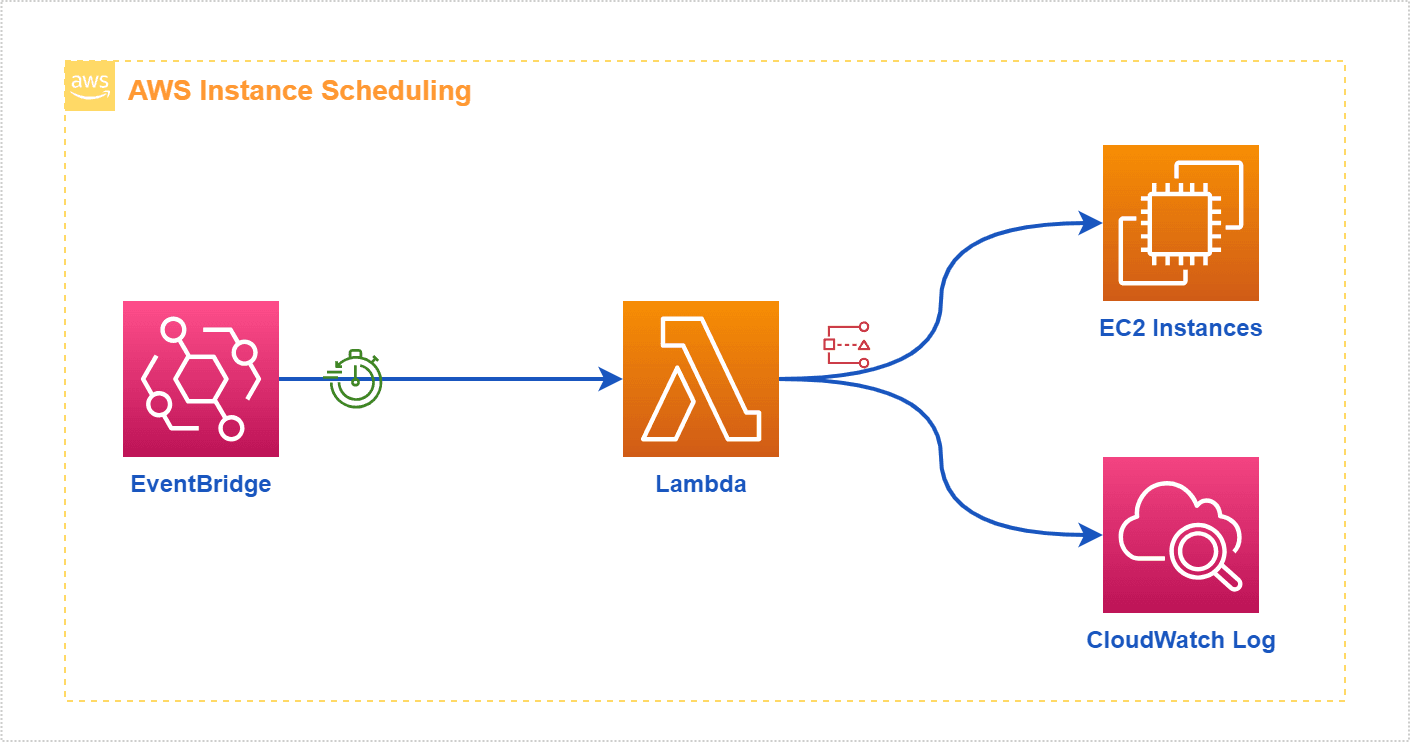
Automate starting and stopping AWS instances
ကျွန်တော်တို့ servers တွေကို EC2 မှာထားတဲ့အခါ running hour အလိုက်ပဲ အသုံးပြုခပေးရတာဖြစ်တဲ့အတွက် အသုံးမပြုတဲ့အချိန်တွေမှာ ပိတ်ထားတာက ကုန်ကျစရိတ်သက်သာစေပါတယ်။
ဥပမာ POS Server တွေဆိုရင် ဆိုင်ဖွင့်ချိန်ပဲ အသုံးပြုပြီး ဆိုင်ပိတ်ချိန်ဆိုရင် အသုံးမပြုကြတာများပါတယ်။ ဆိုင်ပိတ်ချိန်မှာ ဒီ server တွေကို ပိတ်ထားပြီး ဆိုင်ဖွင့်ချိန်မှ ပြန်ဖွင့်မယ်ဆိုရင် ကုန်ကျစရိတ်က လေးဆယ်ရာခိုင်နှုန်းလောက်အထိ သက်သာနိုင်ပါတယ်။ ဒီလို အပိတ်အဖွင့်လုပ်ဖို့က လူကိုယ်တိုင်နေ့တိုင်းလုပ်နေမယ်ဆိုရင်လည်း ရနိုင်ပေမယ့် Schedule ပေးပြီး အပိတ်အဖွင့် လုပ်ခြင်းအားဖြင့် ဝန်ထမ်းရဲ့ workload ကို လျှော့ချပေးနိုင်ပါတယ်။
Instance တွေ ကို Power On/Off Schedule ပေးဖို့က AWS က CloudFormation template နဲ့ ထုတ်ပေးပြီးသား Solution ရှိပါတယ်။ AWS ရဲ့ Solution က powerfull ဖြစ်ပေမယ့်၊ မိနစ်တိုင်း lambda function ကို run နေတဲ့အတွက် တစ်လကို လေးဒေါ်လာဝန်းကျင်လောက် ဒီ schedule အတွက်ကုန်ကျစရိတ်ရှိပါတယ်။ ကိုယ့်မှာ schedule အရေအတွက်က အရမ်းမများဘူးဆိုရင်တော့ EventBridge နဲ့ lambda ကိုသုံးပြီး ကိုယ်တိုင် schedule လုပ်တာက ရိုးရှင်းပြီး ကုန်ကျစရိတ် အများကြီးပိုသက်သာပါတယ်။
ဒီဆောင်းပါးမှာတော့ မနက်ကိုးနာရီမှာ ဖွင့်ပြီး ညကိုးနာရီမှာ ပြန်ပိတ်တဲ့ ဆိုင်တစ်ခုအတွက် POS server တွေကို ဆိုင်မဖွင့်ခင် နာရီဝက်အလိုမှာ Instance တွေကို start လုပ်ပြီး ဆိုင်ပိတ်ပြီး နာရီဝက်အကြာမှာ ပြန်ပိတ်တဲ့ပုံစံမျိုး လုပ်ပြသွားမှာ ဖြစ်ပါတယ်။
အသုံးပြုရမဲ့ Services တွေကတော့၊ အောက်ပါအတိုင်း ဖြစ်ပါတယ်။
AWS IAM
AWS Lambda
AWS CloudWatch
AWS EventBridge
အရင်ဆုံး Lambda function အတွက် လိုအပ်တဲ့ permission တွေပေးဖို့အတွက် Ec2Scheduler-policy ဆိုပြီး IAM Policy တစ်ခု ရေးပါမယ်။ အောက်က policy ကို ကြည့်ကြည့်ရင် Statement သုံးခုပါပါတယ်။
EC2 instance တွေကို start/stop လုပ်ဖို့နဲ့ Instanstance info တွေ view access ရဖို့။
CloudWatch မှာ log group တည်ဆောက်ဖို့။
တည်ဆောက်လိုက်တဲ့ log group ထဲမှာ event log တွေရေးခွင့်ရဖို့ (
Ec2Schedulerဆိုတဲ့ နေရာမှာ ကိုယ်ဆောက်မဲ့ lambda function name အတိုင်းပေးရမှာပါ)။
{
    "Version": "2012-10-17",
    "Statement": [
        {
            "Effect": "Allow",
            "Action": [
                "ec2:StartInstances",
                "ec2:StopInstances",
                "ec2:DescribeInstances"
            ],
            "Resource": "*"
        },
        {
            "Effect": "Allow",
            "Action": [
                "logs:CreateLogGroup"
            ],
            "Resource": "arn:aws:logs:*:*:*"
        },
        {
            "Effect": "Allow",
            "Action": [
                "logs:CreateLogStream",
                "logs:PutLogEvents"
            ],
            "Resource": "arn:aws:logs:*:*:log-group:/aws/lambda/Ec2Scheduler:*"
        }
    ]
}
Policy ရေးပြီးသွားပြီဆိုရင်တော့ Lambda service အတွက် IAM Role ( Ec2Scheduler-role ) ကို Create လုပ်ပါမယ်။ ဒီ role မှာ Ec2Scheduler-policy permission ကို attach တွဲပေးရပါမယ်။

IAM role တွေပြီးပြီဆိုရင်တော့ ကျွန်တော်တို့ lambda function create လုပ်ပါမယ်။
Function Type: Author from scratch
Name: Ec2Scheduler
Runtime: Python 3.10
Execution role: Use an existing role
Existing role: Ec2Scheduler-role

Lambda function create လုပ်ပြီးရင် အောက်က python code တွေကို lambda_function.py ထဲထည့်ပြီး deploy လုပ်လိုက်ပါ။
import os
import boto3

ec2 = boto3.client('ec2')

def get_instances_by_tag(ScheduleGroup):
    instance_id_array = []
    filters = [{
        'Name': 'tag:ScheduleGroup',
        'Values': [ScheduleGroup]
    }]
    response = ec2.describe_instances(Filters=filters)
    for item in response["Reservations"]:
        for instance in item['Instances']:
            instance_id_array.append(instance['InstanceId'])
    return instance_id_array


def start(ids: list) -> list:
    res = []
    try:
        res = ec2.start_instances(InstanceIds=ids)
    except Exception as e:
        return [str(e)]
    return res.get('StartingInstances', '')

def stop(ids: list) -> list:
    res = []
    try:
        res = ec2.stop_instances(InstanceIds=ids)
    except Exception as e:
        return [str(e)]
    return res.get('StoppingInstances', '')

def lambda_handler(event, context):
    action = event.get('action', '')
    ScheduleGroup = event.get('ScheduleGroup', '')
    instances = get_instances_by_tag(ScheduleGroup)
    if (len(instances) < 1):
        res = 'There is no Instances'
        print(res)
        return [res]

    if action == 'stop':
        res = stop(instances)
    elif action == 'start':
        res = start(instances)
    else:
        pass

    print(res)
    return res
Deploy ပြီးသွားရင် ကျန်တော်တို့ Test အသစ်တစ်ခု configure လုပ်ပြီး စမ်းကြည့်ပါမယ်။ Test evnet အသစ် ကို StopPosServers လို့ နာမည်ပေးပြီး အောက်က code တွေထည့်ပြီး save လိုက်ပါ။
{
  "action": "stop",
  "ScheduleGroup": "pos-servers"
}
ပြီးရင်တော့ Test ကို နှိပ်ပြီး စမ်းကြည့်လိုက်ပါ။ အလုပ်လုပ်မှာ မဟုတ်ပါဘူး အောက်ကလိုမျိုး message ပဲ ပြမှာပါ။ ဘာလို့လဲဆိုတော့ ကျွန်တော်တို့ target instance တွေမှာ tag ထည့်ပေးဖို့လိုပါသေးတယ်။ ကျွန်တော်တို့ ရေးခဲ့တဲ့ lambda function က target instance တွေကို ScheduleGroup ဆိုတဲ့ tage key ထဲမှာ pos-servers ဆိုတဲ့ value နဲ့ သွားရှာပြီး တွေ့တဲ့ instance တွေကိုပဲ action လုပ်မှာမို့လို့ပါ။

အဲ့တော့ ကျွန်တော်တို့ EC2 console ထဲသွားပြီး target ထားချင်တဲ့ instance တွေမှာ Tag အသစ် လိုက်ထည့်ပါမယ် TagKey က ScheduleGroup ဖြစ်ပြီး value က pos-servers လို့ ထားပေးပါ။

Tag ထည်ပြီးလို့ ထပ်စမ်းကြည့်ရင်တော့ အောက်ကလိုမျိုး stopping ဆိုပြီး အလုပ်လုပ်သွားမှာ ဖြစ်ပါတယ်။

ပြန်ပြီး start လုပ်ဖို့အတွက် Stop နေရာမှာ Start ထည့်ပြီး ထပ်စမ်းကြည့်ပါ။
{
  "action": "start",
  "ScheduleGroup": "pos-servers"
}
Stop ကော Start ကော အလုပ်လုပ်ပြီဆိုရင်တော့ ကျွန်တော်တို့ရဲ့ Lambda function က အဆင်သင့်ဖြစ်ပါပြီ။ ဒီ finction ကို EventBridge ကနေပြီး သတ်မှတ်ထားတဲ့ အချိန်တွေမှာ Action လုပ်ဖို့ schedule rule တွေ ထည့်ပေးဖို့ပဲ လိုပါတော့တယ်။
Schedule ထည့်ဖို့အတွက် Lambda function အောက်က Add trigger ကိုနှိပ်ပါ။

RuleName နဲ့ schedule ကို အောက်ပါ ပုံထဲကလိုပေးပါ။ တစ်ခု သတိထားရမှာက cron ထဲမှာ time က UTC time နဲ့ အလုပ်လုပ်မှာ ဖြစ်တဲ့အတွက် local time ကို UAT time ပြောင်းပြီး ထည့်ပေးရမှာပါ။
ဒီဥပမာအရဆိုရင် နေ့တိုင်း UTC 15:00 မှာ server POS server တွေကို stop မှာဖြစ်တဲ့အတွက် မြန်မာ အချိန်နဲ့ဆိုရင် ညကိုးနာရီခွဲတိုင်းမှာ stop မှာ ဖြစ်ပါတယ်။

Start အတွက်လည်း နောက်တစ်ခု ထပ်လုပ်ပါမယ်။ ပုံထဲကအတိုင်းဆိုရင်တော့ မြန်မာအချိန် မနက် ရှစ်နာရီ ခွဲတိုင်းမှာ POS schedule အလုပ်လုပ်မှာ ဖြစ်ပါတယ်။


အထက်ကပုံထဲကလို ပေါ်လာပြီဆိုရင်တော့ Stop/Start လုပ်မဲ့ rule တွေတော့ရပါပြီ။ ဒီRule တွေထဲမှာ payload ထည့်ပေးဖို့တော့ ကျန်ပါသေးတယ်။ input payload ထည့်ပေးဖို့အတွက် ဝိုင်းပြထားတဲ့ နေရာတွေကိုနှိပ်ပြီး Rule detail ထဲသွားပါ။

Rule ထဲရောက်ရင် Targets ထဲမှာ Edit ကိုနှိပ်ပြီး အောက်ပါ ပုံထဲကလို ပြင်ပေး ပြီး update လုပ်လိုက်ပါ။

Start အတွက်လည်း ဒီအတိုင်းပဲ ထပ်လုပ်ပေးရမှာပါ။ Json ထဲမှာတော့ start နဲ့ stop ကို သထိထားပေးပါ။ ထည့်ရမဲ့ payload json တွေကို အောက်မှာ ပေးထားပါတယ်
StopPosServers
{
  "action": "stop",
  "ScheduleGroup": "pos-servers"
}
StartPosServers
{
  "action": "start",
  "ScheduleGroup": "pos-servers"
}
ဒီလို ထည့်ပေးထားပြီးပြီဆိုရင်တော့။ ကျွန်တော်တို့ရဲ့ tag ထည့်ပေးထားတဲ့ Instances တွေဟာ သတ်မှတ်ထားတဲ့ အချိန်အတိုင်း Auto Start/Stop လုပ်နေတော့မှာ ဖြစ်ပါတယ်။
Schedule run သွားတဲ့ history / log တွေကို CloudWatch log groups ထဲမှာ ပြန်ကြည့်လို့ရပါတယ်။

အဆင်မပြေတာရှိရင် Comment ကဖြစ်စေ Messanger ဖြစ်စေ လာမေးလို့ရပါတယ်။